HTML Image Maps
With HTML image maps, you can create clickable areas on an image.
Image Maps
The HTML <map> tag defines an image map. An image map is
an image with clickable areas. The areas are defined with one or more <area> tags.
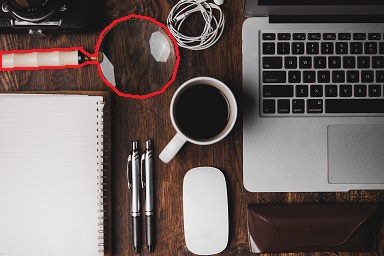
Try to click on the computer, phone, or
the cup of coffee in the image below:


Example:
Here is the HTML source code for the image map above:
<map name="workmap">
<area="poly" coords="79,258, 72,258, 22,289, 21,295, 22,300, 76,384, 140,384, 153,374, 155,367, 152,359, 81,258" alt="Phone" href="phone.html" title="iphone">
<area="poly" coords="383,34, 301,123, 301,126, 292,126, 142,215, 139,222, 138,227, 251,384, 384,384" alt="Computer" href="computer.html" title="macbook">
<area="poly" coords="130,0, 170,15, 90,44, 90,72, 108,102, 142,121, 194,121, 240,93, 250,58, 242,26, 218,0" alt="coffe_tea" href="coffee_tea.html" title="blacktea">
</map>
How does it work?
The idea behind an image map is that you should be able to perform different actions depending on
where in the image you click.
To create an image map you need an image, and some HTML code that
describes the clickable areas.
The Image
The image is inserted using the <img> tag. The only difference from other images is that you must add a usemap attribute:
Example:
The usemap value starts with a hash tag # followed by the name of the image map, and is used to create a relationship between the image and the image map.
Tip: You can use any image as an image map!
Then, add a <map> element.
The <map> element is used to create an image map, and is
linked to the image by using the required name attribute:
Example:
The name attribute must have the same value as the name's usemap attribute.
The Area
Then, add the clickable areas.
A clickable area is defined using an <area> element.
Shape
You must define the shape of the clickable area, and you can choose one of these values:
- rect - defines a rectangular region
- circle - defines a circular region
- poly - defines a polygonal region
- default - defines the entire region
You must also define some coordinates to be able to place the clickable area onto the image.
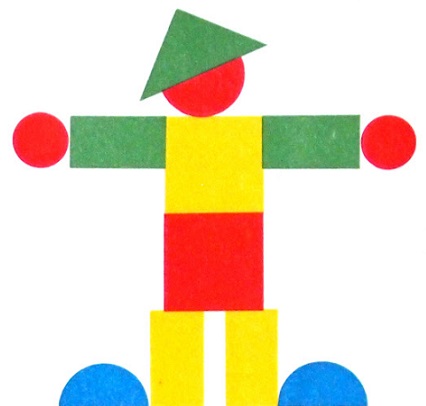
Go Man
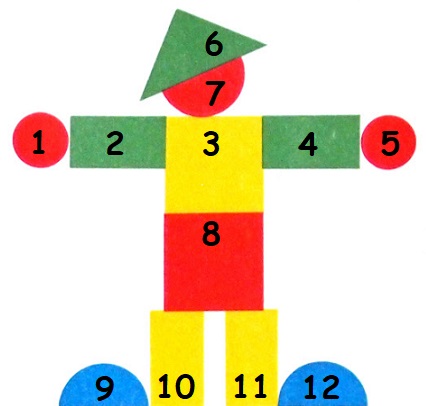
Shape="rect", (2,3,4,8,10,11)
The coordinates for shape="rect" come in pairs, one for the
x-axis and one for the y-axis.
So, the coordinates 1,2 is located 1 pixels from the left margin
and 2 pixels from the top.
Now we have enough data to create a clickable rectangular area:
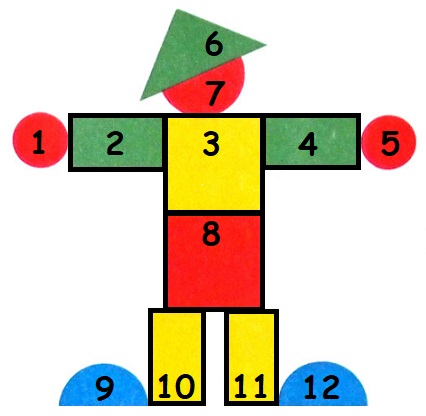
Mapped Go Man

Example:
<area shape="rect" coords="166,214,263,117" href="rectangle.html" title="shape 3: rectangle"
<area shape="rect" coords="263,117,360,168" href="rectangle.html" title="shape 4: rectangle"
<area shape="rect" coords="166,214,264,310" href="rectangle.html" title="shape 8: rectangle"
<area shape="rect" coords="226,311,278,406" href="rectangle.html" title="shape 11: rectangle"
This is the area that becomes clickable and will send the user to the page "rectangle.html":
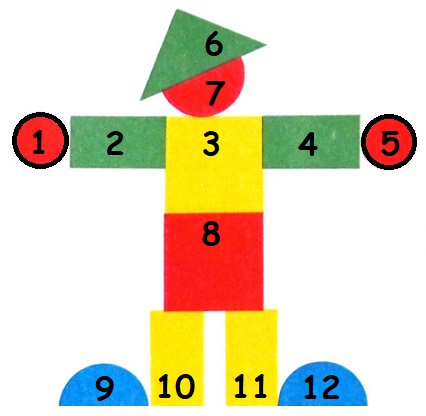
shape="circle"
To add a circle area, first locate the coordinates of the center of the circle.
Then specify the
radius of the circle.
Now you have enough data to create a clickable circular area:
Example:
<area shape="circle" coords="389,141,28" href="circle.html" title="shape 5: circle"
This is the area that becomes clickable and will send the user to the page "circle.html":
shape="poly"
The shape="poly" contains several coordinate points, which creates a shape formed with straight lines
(a polygon).
This can be used to create any shape.
Like maybe a triangle shape!
How can
we make the traingle in the image below become a clickable link?
We have to find the x and y
coordinates for all edges of the trianle:
The coordinates come in pairs, one for the x-axis and one for the y-axis:
Example:
This is the area that becomes clickable and will send the user to the page "triangle.html":
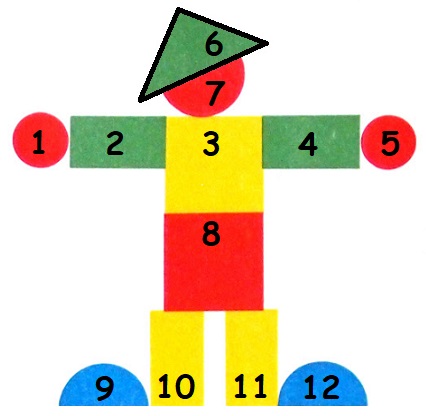
Image Map and JavaScript
A clickable area can also trigger a JavaScript function.
Add a click event to the <area> element to execute a JavaScript function:

Example:
Here, we use the onclick attribute to execute a JavaScript function when the area is clicked:
<area shape="circle" coords="0,54, 0,68, 77,66, 87,62, 96,62, 101,76, 108,84, 120,94, 142,97, 161,91, 173,78, 178,58, 175,42, 164,26, 149,18, 132,15, 115,21, 102,32, 96,48, 96,55, 90,55, 80,49" href="magnifying_glass.html" onclick="afunction()">
</map>
<script>
function afunction() {
altert("You clicked on the magnifying glass!");
}
</script>
Chapter Summary
- Use the HTML <map> element to define an image map
- Use the HTML <area> element to define the clickable areas in the image map
- Use the HTML usemap attribute of the <img> element to point to an image map